|
User Interface
This is a walk through the SAFE EMS User Interface and assumes that you have it installed on your computer. If not, then you to need to go to Section D in this manual and find out how to load/install the UI (User Interface) onto your computer. To learn to use the UI you do not need to have a radio, it is just that without a radio you will not be able to actually send or receive messages.
D. Radio Setup E. Power Supply F. Antenna Setup Once the system has been set up - the only information necessary to physically operate the SAFE EMS in peacetime is in THIS C Section User Interface (UI). During a catastrophe one would need to be associated and familiar with the concepts found in Section: H. - S.A.F.E. Networking. A. "S.A.F.E. EMS Introduction" is a general introduction to the system. G. "EMP Protection" contains instructions on how to protect the hardware from EMP. I. "Modification Support" contains tools and documentation for programmers wishing to modify this User Interface. J. "On-line Documentation" is the link to The SAFE EMS (Emergency Messaging System) on-line documentation. K. "Build Info" allows you to know which version you are working with in case we make changes in the future. L. "About" gives a very brief explanation about the purpose of the SAFE EMS System as well as the historical sources of the system and lists our teams for both hardware and software. There is also on your transport media - Source code and tools for re-engineering the software.
(If the system is set up -
Below is approximately the screen that you should see on your computer when you open the S.A.F.E EMS user interface. 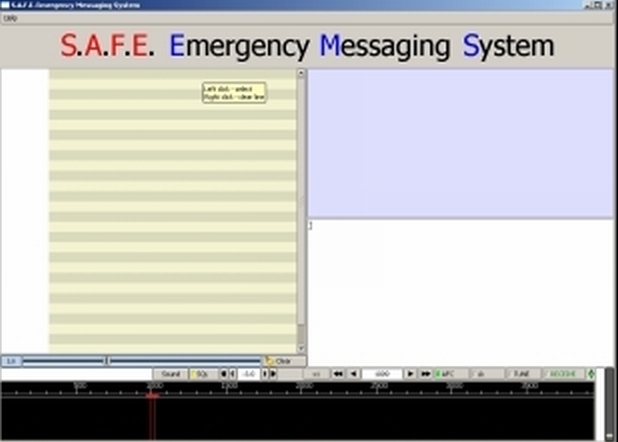
We have reduced the program to the following fourteen (14) variables from what were over thirteen hundred (1300) in the original system which we simplified. These fourteen variables are usually patently obvious or have defaults set for them. Just follow through this tutorial and do each of the exercises/functions as they are explained. It is best to repeat the function - play with it - until you are comfortable with it. They are very simple actions and it won't take you long to understand them and to be conversant with the software. After a short time of actual usage and practice you won't even need to think about it. It is actually all very simple but it is explained here in minute detail. First the four 'windows'. Window One: the "multi-channel" window
b. At the bottom of the "multi-channel" window is a blue slider bar that adjusts from -6.0 to 20.0 to control noise suppression in the "multi-channel" window. The higher the number the more the suppression. If you are not hooked up to a working radio, and you set the value low enough you will see random garbage being generated by your sound board. c. If you click on one of the channel bars in the window three things will take place. (1) That bar will become highlighted in black. (2) The pointer on the waterfall will jump to that frequency and (3) the signal being received on that frequency will be displayed in the purple signal receiving window. It is important to understand this relationship between the selected channel in the "multi-channel" window and both the pointer on the waterfall and the "purple signal receiving window" if it is not being intentionally suppressed there. Just taking a few moments to change bar selections on the "multi-channel window" will make the relationship apparent. d. There is at the bottom of the "multi-channel window" a clear button which will clear all the channels simultaneously. If the suppression slider is set low enough, then in a few moments signals or noise will again begin to appear in the "multi-channel window".
b. Using your mouse on the waterfall - a yellow pointer will appear where ever you point your mouse. c. Wherever you left click your mouse on the waterfall - the red pointer will jump to that location and the frequency will be displayed in the frequency display window on the control bar - which is discussed further down. d. When you select a frequency with the red pointer - the dark highlight bar that we just discussed in the previous "multi-channel" window will simultaneously move. e. In practice you will move the frequency selector onto some signal that you wish to read in more detail than you are seeing in the multi-channel window, or onto some frequency where you wish to transmit. f. You can also remotely move the red pointer on the waterfall by moving the highlighted black bar in multi-channel window - as discussed above.
b. If you fill the window with text there will appear a slider bar to the right of the window that will permit you to navigate up and down in the window. c. You can change the boundary of this window by putting your mouse on the button dividing it from the window above and left clicking your mouse so that you can move the dividing bar up or down. d. The right button on your mouse provides you with five important functions in this window. (Just place the mouse pointer in the window and click on the right button of the mouse.)
and with the right button select "cut" from the drop down menu.
and with the right button select "copy" from the drop down menu. The copied material will be stored on your computer scratch pad for use as with any text editing program.
the text that is on your computer scratch pad (this text may have been copied a source other than in this program) and with the right button select paste from the drop down menu.
b. If the window fills with text, there will appear a slider bar to the right of the window that will permit you to navigate up and down in the window. c. You can change the boundary of this window by putting your mouse on the button dividing it from the window below and left clicking your mouse so that you can move the dividing bar up or down. d. The right button on your mouse provides you with five important functions in this window:
information that you wish to copy and with the right button select "copy" from the drop down menu. The copied material will be stored on your computer scratch pad for use as with any text editing program or for pasting into the white window.
and select a folder where you want the information in the window to be saved.
a. The small "white" window/box at the left-hand side of the Control Bar is where there may appear a rare message from the system if something should go astray. You may never see a message there. b. Moving to the right along the Control Bar the first button marked "Sound" brings up the window for configuring the sound card.
At the right-hand side of both the Capture and Playback bars/buttons you will see an expansion symbol. By clicking on the expansion symbol you are given a choice of the various resources in your computer that you can choose among. You wish to choose the one that you have your transceiver plugged into. You can then save the configuration with the Save button (the middle button at the bottom of this window that you have opened. If for some reason you decide to use/try other devices you can temporarily do so and then use the "Restore defaults" to return to the defaults that you have saved. Other variables in the window that are not related to your application are inoperable or defaulted to your requirement. When you are done with this window you can either use the "Close" button or the usual window control buttons in the upper right hand corner of the window. After initially installing your software, you may never need/wish to access the "Sound" button/window again. c. The next button to the right is the "SQL" (squelch) button.
When the SQL is on, you can then control the amount of squelch with the vertical slider at the far right of the Waterfall and Control Bar. The squelch controls the amount of noise being received/displayed and helps you to clear up the signal.
This display must be used to set the signal indicator on the front of the radio transceiver so that the latter shows as nearly as possible three bars/LEDs. One MUST NOT overdrive the signal to the transmitter. This is the control one must use to prevent overdriving. f. The next item is also a number in the middle of a white box, this time just past the middle of the bar. This box is the frequency display window and displays the frequency the red cursor is currently at on the waterfall. For the sophisticated user - this is the most important button on the control bar. It is possible to operate and ignore it by just selecting channels on the waterfall or in the multi-channel window.
Doing so - you should note that the red cursor on the waterfall moves left and right across the scale. Using this jogger on the control bar is a method of fine tuning the cursor location and the frequency that you are using. The numbers in the Multichannel window do not reflect as finely the numbers being diplayed in this channel selector window or on the waterfall. By rounding the numbers of the Multichannel window you will see that there is a direct but not exact correlation. The number in the frequency display window is the standard/reference number so far as the User Interface is concerned. The accuracy of the frequency display and its relationship to the scale on the waterfall are presented in detail in Section D of the HELP menu (or the Table of Contents) on "D Radio Setup" for those who are technically adavanced. h. The next button to the right is the Lk (Lock) button.
You can then move the red cursor to a new location on the waterfall. When you click there the frequency display window will display the new frequency. Later - if you wish to return to the first frequency - you can move the red cursor back to the blue marker.
1. Using the frequency selector on the waterfall - first select a frequency on which to transmit. It may be on a signal which you have selected to receive. 2. Using the white message composition window compose or paste in a message that you wish to send. (You can actually compose and simultaneously transmit in real time if you type well enough and that is your wish). 3. When the channel is clear -
b. immediately change the RECEIVE button (j above) to TRANSMIT (and you will hear the transmitting signal). c. monitor the signal level LEDs on the front of your computer to determine that the level is 3 LEDs or less - but as close to 3 LEDs as you can attain. d. watch the green window to see when you message completes transmitting. e. when your message completes transmitting - immediately change the RECEIVE/TRANSMIT switch on the front of your transceiver to RECEIVE. f. On your computer UI (User Interface) change the Red TRANSMIT button back to Green RECEIVE. If you are not an ADVANCED ham it is not legal/permissible for you to use the system to transmit in a non-catastrophic situation. The reason for this restriction is not because the system is difficult to operate, because it is in fact, especially as we have designed it, probably the easiest and most reliable to use of all ham systems. The reason for the restriction is simply that it is used as a reward for those who have gone through the effort required to obtain an Advanced Ham license. While it is illegal, in non-catastrophic times, for others than advanced hams to transmit using the system - it is perfectly legal for anyone to receive on the frequencies at any time. Your SAFE EMS transceiver is shipped to you with the transmit capability disabled because it is illegal to provide them with it transmit enabled to individuals who are not authorized to use them for transmitting. For advanced Hams to enable the transceiver for transmitting it is only necessary for them to connect a jumper as described in the Radio Setup section of this manual. |