Ready for some hard core gadget creation? If you
thought
your dremel tool was handy before, in today's How-To we'll start
building
our own CNC machine. Aside from the geek factor, it can be handy for
making
things like PC boards without chemicals or maybe some little styrofoam
voodoo
heads of all your
enemies,
uh
friends.
Gentlemen, start your soldering irons.
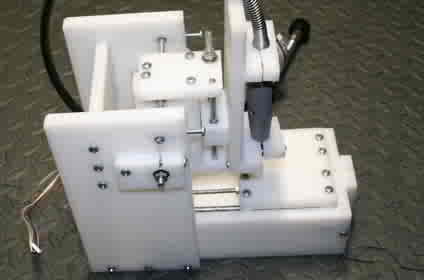
Computer
controlled mills have been around for a long
time. If you just want to buy oneone,
Sherline
makes mills that are ready to go
(pictured is their CNC ready model -- just add your own motors and
controller).
But then again, if you wanted to buy one, you probably wouldn't be
reading this,
now would you? A CNC machine is a lot like a precision drill press with a
table
that moves in two directions -- seeing a commercial unit like the one
above
should help you visualize the end goal. We'll be making ours from
scrounged,
recycled, and adapted parts; today we'll be going over the basic parts
we'll
need to build our own.
[Update: If you're not quite sure what a
CNC
machine is, check out the
Wikipedia
article, mkay.]
Parts
HuntingFor Part 1 of the How-To, we'll go over all the major
components of the project and get started with the controller.
The
major
components of the DIY CNC machine:
- Stepper motors
- drive positioning screw
- 3 Axis stepper motor controller
- Linear slides
The most important component to determine the
construction of your milling machine is the motor. Motors can be
purchased from
surplus houses, but the cheapest place to get them is from old dot
matrix
printers. Apple Imagewriters are one of our favorite sources. They
contain
multiple stepper motors, and the primary is pretty beefy. As a bonus,
just about
every dot matrix printer has a hardened steel rod that can be useful for
our
nefarious goals.
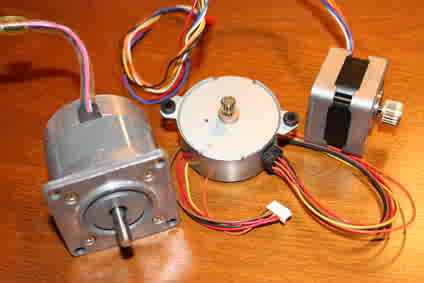
A stepper motor is an odd beast. Most motors spin when
power is applied, stepper motors contain multiple coils. If the coils
are
energized in the proper order, the motor will rotate a small amount (a
step).
We'll take full advantage of the nature of stepper motors with this
project. To
simplify your life later on, you'll want to find stepper motors with
more than
four wires. Four wire motors are usually Bipolar motors. They produce
more
torque, but end up complicating the control circuit. The preferred type
of motor
for the frugal hobbiest is Unipolar. These usually have five or six
wires, and
they're pretty easy to work with.
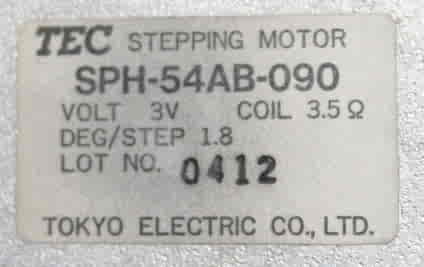
Most stepper motors are labeled. The major points of
interest include the voltage, resistance and the number of degrees per
step. Knowing the number of degrees per step is vital for
configuring the
software to properly control the machine later on. For a three axis
machine, at
the very least you'll want the X and Y axis to both have identical
motors. It's
not the end of the world if they don't match, but it's more of a pain
later
on.
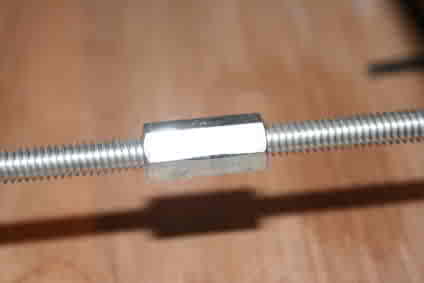
The drive screw is the next piece of our project.
Commercial units use linear ball screws or linear gears. The commercial
parts
aren't cheap, but you can get away with some 1/4-inch threaded rod from
the
hardware store. Instead of anti-backlash nuts, we'll use these handy
1-inch long
1/4-inch nuts. Just about every hardware store has them, and they
produce very
little play. Try out the hardware at the store because defects in the
nut or rod
will produce drag that's easily noticeable by spinning the nut on the
rod.
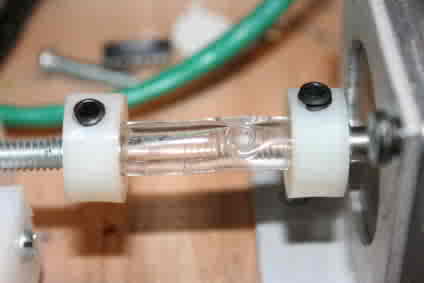
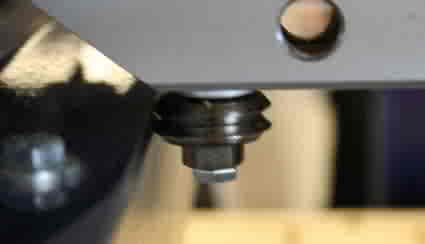
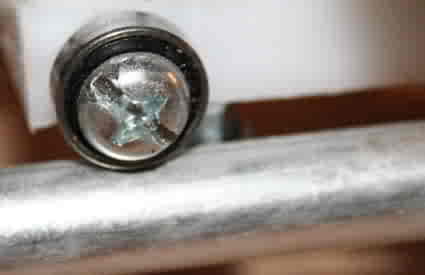
To couple the rod to the motor shaft, we'll use vinyl
tubing with a pair of collars. The tubing is 1/4-inch inner diameter and
prevents binding by allowing some play between the rod and the motor.
You can
get suitable collars from a model airplane store (The hardware store had
some,
but they were overpriced). Alternatively, you can make your own like we
did from
nylon bushings and hex screws.
Finally, we'll need some linear slides. One easy out is
to purchase a used or surplus XY table that's built just for this
purpose.
Custom designs can be built using ball bearings. Above is the linear
rail that
ShopBot uses. They machine
the edge
of a piece of steel and use this cool angled roller bearing.
We built this linear slide from a 1/2-inch steel rod
and
multiple bearing surfaces. It works, but we don't recommend building it
if you
value your sanity.
Once uou've bought or salvaged a set of motors, you'll
need a controller. The controller provides the interface to the
computer, drives
the motors and can provide some simple feedback to the computer. The
stepper
controller has to be powerful enough to drive the motors you've
selected. We
sifted through lots of stepper controller designs looking for one that
presented
the best value.
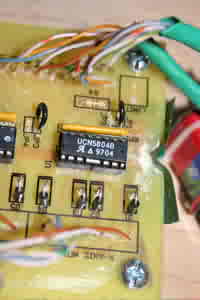
In the end we found
this design
for a
relatively simple parallel port interface that originally appeared in a
1994
issue of Nuts and Volts. Today, the expensive UCN5804B is only available
as a
surplus item, but now the entire controller can be built for about
$22-$30 in
parts. (If you use a heavier motor like the ones from the Imagewriter,
you might
need to add some separate power transistors.)
The parts list at
the link
is a bit outdated, here's our updated shopping list.
- 3 - UCN5804B - alltronics.com
- 12 - 1N49355 Diodes - Part 625-1N4935 from Mouser.com
- 2 - .01uF Capacitors - Part 581-SR155C103KAT from
Mouser.com
- 1 - 10uF Capacitor - Part 140-HTRL25V10-TB from Mouser.com
- 3 - 4.7k Resistor Network 652-4608X-101-4.7K from Mouser.com
(Has an extra
resistor, but works fine)
- 1 - D-Sub 25 pin Male - Mouser, RadioShack, etc.
- 1 - Barrel power connector - Whatever works for your power
supply. (We
used a spare 12V power brick)
- Stranded Cat-5 is sufficient for wiring
- Terminals and male headers are optional, see the page for the
circuit.
- Heat sinks for the 5804Bs are needed. We used some aluminum
channel.
- Copper clad PC board (We stock up on ebay every so often)
- Etching solution - Ferric Chloride, etc.
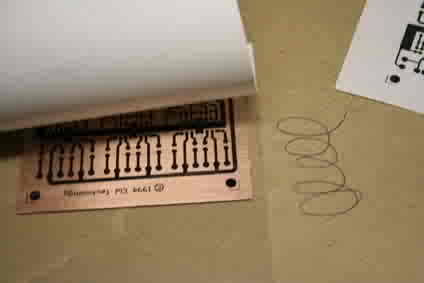
We made our own board using the template from the web
page. We used similar techniques to the one in part 4 of our
iPod
Superdock How-To. We reversed the pdf image using Gimp, and printed
it onto
a laserprinter transparency. This method doesn't create as nice of a
trace as
the paper, but it's speedier. Clean the board, and keep the paper
backing
between the plastic and the iron. Once the toner is ironed, just cool it
with
water and peel.
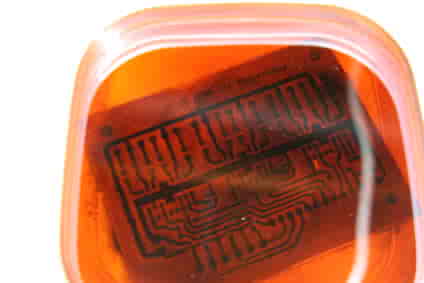
We etched the board using Ferric Chloride from
RadioShack in a disposable Zip-Lock container. It needs to be warm and
agitated
to work well. The acid and hydrogen peroxide solution etches way faster.
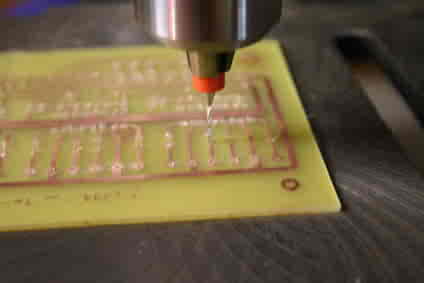
We drilled the board with our drill press and tungsten
carbide bits from Drill Bit City. We had to refer to the placement
schematic
several times to make sure we drilled everything right. Getting the pins
holes
aligned for the 5804s is a challenge!
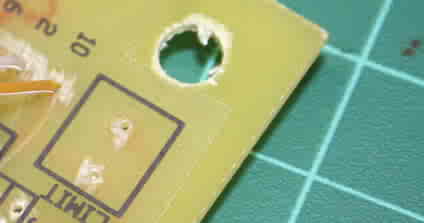
If you want to do a toner transfer of the placement
mask, do it before drilling the holes. Otherwise the surface is too
uneven to
allow a good transfer. If you screw it up like we did, you can cheat.
Just print
the mask onto a transparency and burn holes for the components with a
soldering
iron. It works surprisingly well.
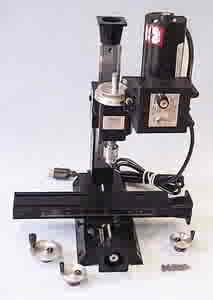
Next
time we'll start building the actual machine and
show you how to build some simple and effective slide systems. For now,
here's a
teaser of what's coming! Good luck!
Tags: cnc machine, CncMachine, how to, how-to, HowTo

 - Engadget_files/817-grey.gif)


 - Engadget_files/SE110_300x250.gif)

 - Engadget_files/launch_back_300x250.gif)


 - Engadget_files/generictravel_160x600.jpg)

 - Engadget_files\generictravel_160x600(1).jpg)
 - Engadget_files\817-grey(1).gif)
 - Engadget_files\817-grey(2).gif)
 - Engadget_files\817-grey(3).gif)
 - Engadget_files\817-grey(4).gif)

")


")
: Zune Social")
: WiFi sync")
: upgrade")


 - Engadget_files\817-grey(5).gif)


Reader Comments (Page 1 of 1)
Osiris @ Jun 29th 2006 6:32PM
Be nice if you actually mentioned wtf a CNC is in the intro..
LH @ Jun 29th 2006 6:39PM
CNC stands for Computer Numerical Control. See http://en.wikipedia.org/wiki/Cnc
My father build a lot larger machine as his master's thesis in the early 80's. All the programming had to be done in assembly. So I don't envy him. He even didn't study any computer stuff before starting to buil it.
Rob @ Jun 29th 2006 7:07PM
So what kind of accuracy does this unit you've built offer? If its anything like the .0002" I get out of my Bridgeport Interact 410, well then I think your onto something here... I wonder if a MasterCAM post is possible for whatever controller your using, does it take M Code or only G Code?
Nick C. @ Jun 29th 2006 7:37PM
Fantastic! I've been wanting to mill out some tiny gears for making tiny robots....aw, I don't have a laser printer...breadboard...mmmm
Timmy!!! @ Jun 29th 2006 7:40PM
@ Osiris:
if you dont know what a CNC is, then odds are you wont need to know how to build one, no?
Greg @ Jun 29th 2006 8:30PM
I have been interested in building a CNC machine as a project after I finish my DIY projector this weekend. I would like to know 2 things: The cost of the completed CNC and the size of wood and accuracy it will cut. Thank you in advance.
Greg Y
Nathan Stratton @ Jun 29th 2006 8:52PM
This is cool, but your not going to get any real resolution. A good way to build a low cost CNC is to start with a milling machine, you can get the X2 for about $500 and buy a conversion kit at www.cncfusion.com, I recommend getting the ball screw if you want to get rid of the play in the original X2. You then need a controler, I like the Xylotex, they also can sell some good steppers. That is enough to get started, but I wanted a bit more so I bought some darlington optical switchs, you only need a few resisters on each switch, one to drive the LED and one as a pullup resister on the darlington output. I added home switches on all X Y and Z. I use EMC2 (http://www.linuxcnc.org/) to drive the CNC, AutoCAD Inventor to make my parts and MasterCam X for toolpath setup.
Matthew Kennedy @ Mar 10th 2007 5:46PM
Hey Nathan,
My goal is to make injection molded parts. Step 1 is to make a CNC machine; Step 2 is to make an injection molding machine. I need a CNC that can operate on a 12" square bed to make an 8 cavity mold. No commercial desktop CNC as far as I can see can do this (Lightmachines has a 12"x7" bed). In your opinion, can I make a durable/accurate desktop machine with 12"x12" travel that can cut tool steel (or at least aluminum)?
Nathan Stratton @ Jun 29th 2006 8:55PM
Oh, one more thing, if you upgrade your X2 with ballscrews and get a good steper driver you can get 1/8000th resoution without any problem. I can do a X Y Z jog all around the table for 5 - 10 min and still get back to home.
Alexander @ Jun 29th 2006 10:19PM
The best part about your first CNC machine is that your 2nd is going to be MUCH easier to assemble, because you can mill out the parts using your first one.
I recommend that everybody who is seriously thinking about building one of these look on eBay for old line printers, preferably one that is not from a 'home' environment. Sure, the old ImageWriter is an easy find on eBay, but lets face it--it was never designed for 16 hours of continuous use, running over 7000 pages a day, 5 days a week.
I work in a computer warehouse, so I snagged quite a few 1.8 degree steppers and a whole heaping helping of stainless steel rod that will be perfect for the table. The best part is, these motors will half-step which will only make my CNC even more accurate.
I'm going to use mine for milling out PCB's instead of using etching fluid. Blech. Why use dirty, nasty, stinky etching fluid when you can simply slap a PCB down and have it mill out the circuit and then drill it? Just tin and you’re done.
Arthur G @ Jun 29th 2006 11:40PM
This is an awesome article. And comments. Working as the network admin at a plant that does some extensive industrial milling, I had no idea hobby CNC mill building was so popular, or accessible. Methinks I'm gonna build myself one.
Brian @ Jun 30th 2006 1:27AM
This article was ok, but very specialized. Not everyone needs to read this much info on this topic. Could you guys please use a link instead of a super long post in the feeds section. This is a major pain to browse (especially on a PDA)
euxneks @ Jun 30th 2006 2:05AM
>Be nice if you actually mentioned wtf a CNC is in the intro..
http://fuckinggoogleit.com/
You have the greatest repository of knowledge the world has ever known at your fingertips and you want to be spoon fed the information? "wtf" indeed.
icruise @ Jun 30th 2006 3:25AM
If you're going to write a whole article about how to build something (especially on a site like Engadget, with a wide readership of various technical backgrounds) then it seems like it would be a good idea to explain what it is and what it does. I think we can all use google, thank you very much.
Osiris @ Jun 30th 2006 4:54AM
Look, just because i CAN google it (and did) doesn't mean they couldn't so briefly sum up what it is in a one sentence.
Yes, i'm not exactly going to build one right away, but i am still interested to know what Engadget is trying to build..
Don't assume that because i don't know what it is i'll have no interest in it.
J @ Jun 30th 2006 8:16AM
engadget caters to a fairly geeky crowd.. should they have to explain what "wifi" "dap" "umpc" are every single time they use them?
oshean @ Jun 30th 2006 9:52AM
J,
Do a search for CNC on Engadget and you will get two hits, which includes this blog. Because we all know that CNC is such a common thing around Engadget, like WIFI, DAP, and UMPC!
blackfeather @ Jun 30th 2006 1:43PM
At last! I have to tools to create and unleash my miniature robot army upon the world! Mwaa ha haa!!
ppj @ Jul 1st 2006 1:04AM
can you use gumstix as the controller, thanx
Utsav @ Jul 1st 2006 10:58PM
Can't wait for part 2. Really, really can't wait. Thanks for the awesome article.
I'm actually searching for parts for this. However, I'm intimidated by the picture you have shown, as it looks difficult to make.
Raisingod @ Jul 5th 2006 7:51AM
Well I gave it some thought and since this project uses setp motors for degree mesuring an optical encoder might be a beeter solution since you can configure it how you like (its also cheaper since regular motors plus 8 IR led Reciver and transmiter cost less then a Step motor and controller for it )
Seth @ Jul 5th 2006 5:42PM
What projects can this homebuilt CNC be used for?
This is an fasinating article, even if you don't want to build one, or didn't intially know what a CNC machine was. That's why we visit Engadge - to learn.
Since this is such a challenging homebuild project, there must be some really neat things this CNC can be used for.
lotmi @ Jul 12th 2006 3:00PM
There's an artist out there who's done some awesome stuff (imho) with motion controled motors ... check it out ... http://www.taomc.com/art_machines.htm
steve @ Jul 12th 2006 3:43PM
will most dremmel tools fit the head stock or is there a piticular type for this . great project buy the way look forward to next part
Richard @ Jul 13th 2006 6:22AM
The resolution of the stepper motor does not indicate the accuracy of the machined part. Most of the error on my home-built CNC mill is due to the clearances in between the various parts (backlash) that all add up each time the direction reverses. The backlash is independent of the calculated resolution of the stepper motor / drive screw.
Tachyon @ Jul 14th 2006 2:06AM
Re comment #1.
If you're such a moron you don't know what CNC is, then;
a) You probably shouldn't be reading engadget
b) You certainly won't need to know how to build one.
Go read MySpace or something else at your skill level.
Curt Carpenter @ Jul 18th 2006 11:01PM
Four notes:
1. Another good source for hobby CNC parts is old scanners. Many of these contain two-rail positioning systems with stepper motor/timing belt drives that can be adapted immediately to CNC router use. Older scanners moved fairly heavy lens systems about -- so their mechanics tend to be "robust."
2. The NJM3517D2 available from Mouser is an alternative unipolar stepper motor controller IC that offers full and half-step control, forward or reverse, for under $3.00.
3. Harbor Freight Tools offers a 12VDC rotary tool like a dremmel, but much lighter, for under $10. Since it's 12VDC, it's easy to control on/off.
4. Suggestion: build your first machine for fun and to get some appreciation of the
hardware and software challenges. Worry about accuracy on your second machine. Then buy your third machine from a commercial supplier if you really need that 0.001 accuracy.
Boyan Biandov @ Jul 19th 2006 7:40PM
Very nice, I love the cutting board idea. Much cheaper than acrylic scrap - good going!
bithead @ Jul 24th 2006 1:19PM
Here is an URL for a Kleinbauer-derivative desktop CNC machine. There are multiple PDFs totalling 95 pages of step-by-step instruction on how to build a CNC machine that is excellent for making PCB boards.
If you cannot follow the instructions in these documents to successfully make a working desktop CNC machine then I feel your situation is hopeless. I paide $35 bucks for Kleinbauer's "Brute" plans, then spent considerable time simplifying the construction with the intent of publishing an easier to manufactuer machine. Somebody else beat me to the goal, apparently in 2004. Wish I had found this before I sent off the $35!
http://www.liutaiomottola.com/Tools/CNCRouter.htm
Ax @ Aug 6th 2006 12:07AM
Upon doing more research of other websites and a few books I also found another driver chip...the L297 which is available for half the price on alltronics
and seemingly should work every bit as well (perhaps better given it's ability to bridge for 2 axis operation)
Additionally , I lucked out in 2 ways, first I found a set of new old stock stepper motors on ebay for 16$ shipped..
second...at a garage sale I found an old exercise machine, a rowing/ski machine, which with some modifications proved to save me TONS of work and money in assembling my x axis ($5 bucks and 20 minutes well spent)
Additionally, I happen to have a dremel router attachment (not the table, the handheld model) which at the very least will prove useful for holding my dremel in place and may very well serve as a solid basis for my z axis
Curt Carpenter @ Aug 8th 2006 1:06PM
Thanks to bithead for the outstanding link to http://www.liutaiomottola.com/Tools/CNCRouter.htm -- great resource.
To PC board makers: I've been using an old HP pen plotter and TurboCad software to draw directly onto copper laminate. I have been able to do double sided PCBs on a 50mil grid reliably using "Sharpie" markers for resist pens. The whole rig, complete with plotter and software, can be had from ebay for about $60. Of course you'll need to make a little "tooling" (only tools needed: scissors!) and do some software hacks -- but you're ready for that, or you wouldn't be here! :)
Loved the rowing machine x-axis! I gave my machine to a friend a few years back. Damn!
Sudhakar @ Aug 11th 2006 6:42AM
Nice site, Informative.
Sudhakar @ Aug 11th 2006 6:49AM
Its nice site,very good information.
nikolaw @ Aug 28th 2006 9:28AM
i will going to build this cnc
does kcam sof. can inport gcode file from solid cam sof
does this mashine can make 3d forms like pc mouse
Oscar Gonzalez @ Nov 15th 2006 1:07PM
its interesting . sorry for my english
thanks
Oscar
Oscar Gonzalez @ Nov 15th 2006 1:15PM
its interesting , I need build a router , thanks
Oscar Gzz
chean @ Dec 5th 2006 1:39AM
found easy building ideas
Dutch Pete @ Jan 22nd 2007 6:37PM
Great site!
Liked the idea of disassembling a rowing machine!
When is part 2 coming???
Peter
yarko @ Jan 25th 2007 12:31PM
Hi,
I made a cnc router, the plans are freely available at:
http://www.cnczone.com/forums/showthread.php?t=29002
chris thomas @ Feb 8th 2007 10:43AM
Great article. Keep in mind that the average person (above average) who attemts to build this type of machine fall into two groups: The kind who can read a micrometer and understand how unimportant 1/10 th of one inch in most home projects.
And: the person who doesn't and is still willing to build an automated machine. Imagine if someone from the 1800's read this article....
Evan M @ Mar 27th 2007 10:27AM
re 1800's machine.
I can imagine a steam powered beast, stinking of coal and hot oil with a stack of punch cards clacking their way through a reader.
This link goes to a video part of which describes cutting a die for injuection moulding - sound like a big job for a big tool to me. http://www.taylorguitars.com/video/factory-fridays/default.aspx?edition=14&title=14%3a+Tooling
Carl Erickson @ Apr 16th 2007 1:37AM
Hey that's brilliant. I don't know who you are "Will O'Brien" but I've got a project you'll go nuts for. Please drop me a line.
Carl
[email protected]
www.phenostream.com
fasih ur rehman @ Apr 17th 2007 10:47AM
\
manecas @ Apr 18th 2007 6:07PM
1-state the problems associated with setting and operating aCNC machine via a console:
a)reduction in operator sense of feel?
b)lack of direct manual control?
c)lack of programming knowledge?
2-describe guarding and interlockingdevices used on cnc machines.
A-a)totally enclosed?
b)interlocked?
B-effects of guarding on work/tool holding and unloading?
a)dificult of acess?
b)restrition due to design i.e. position of acess?
C-care during unguarding program proving?
3-state the importance of program proving for prevention of damage to equipment and work.
a)to ensure colision free tool paths at the progam proving stage?
b)prevention of damageto tooling,workholding devices,and work?
4-state problems associated with the removal of waste from the working zone of CNC machines.
A-volume of waste to be removed?
B-hazardous nature of waste.
a)heat?
b)sharp edges?
C-type of waste?
5-state the hazards associated with manual and automatic work and tool changing.
a)sharp cutters?
b)hazards associated with inadequate clearance?
c)hazards associated with incorrect location?
d)hazards associated with incorrect sequencing?
6-describe procedures for restarting a CNC machine after emergency shutdown in terms of :
A-problems that may be encountered .
a)machine may return to home position by shortest route regardless of obstrutions?
b)functions may have beenwiped from machine memory?
B-procedures to be followed:
a)move tool to clear position?
b)reset and check datum (as necessary)?
c)check state of program for tool length and diameter offsets as well as correct mew program mid start position (if possible) (select suitable start position in program)?
well that is it i need all the answers please to check with my own answers because i have final examination next week and i need to make sure that i'm rigth and not gonna do bullshit thank you all if anyone can help me please be my guest .
Matt M @ Jul 9th 2007 9:25PM
I don't think that you'd be able to cut through any normal amount of tool steel with a normal CNC machine. I would suggest making accurate foam copies of parts, and forging the parts. Reference the LFCP (lost foam casting process) on wiki.
Chris Zajkowski @ May 29th 2007 3:28PM
Very interesting article. I am going to add a link to it on my website. http://www.acmanufacturing.com/
Caleb Edwards @ Jun 16th 2007 7:10PM
I'm a bit late in posting...but if you still need that quiz done...
I have your answers but it'll cost you. Do you have paypal?
Tooling U @ Oct 15th 2007 5:19PM
The most effective way to build your own cnc machhine is to first take CNC training lesson to find a proper way to do it.
You can take Online CNC Classes at:
http://www.toolingu.com/
Ali @ Nov 25th 2007 9:45AM
I would like to buy abook for design of NC&CNC machines or for design of NC&CNC milling machines &lathe . Please advice me thanks