|
Hooking Up Your Electrical Connections For The AlternatorAs was mentioned before, because of safety and ease of hook up, stick with the GM style alternator with a Built in Voltage Regulator. If you are not sure, ask the people you are buying the alternator from, if they can't answer your question consult an automotive parts professional. "No guarantees are expressed or implied as to the accuracy of the information presented here. If in doubt consult an automotive wiring professional before you attempt any wiring." If you make a mistake wiring the alternator you run the risk of damaging your batteries, electronic gear and worst of all causing personal injury. We set out to make this project safe and simple, so we are going to concentrate on the easiest hook up.
 The electrical connections for your alternator are a simple but
important 4-wire hook up. It was mentioned earlier that the GM alternator should come equipped with
a 2 wire molded connector/harness. If not, ask for it at the point of sale or you can purchase one
at an auto supply store. Ask for a 2-wire harness plug for the GM style alternator with built in
regulator. They only cost a couple of bucks.
Attach your harness into the connector slot on the alternator casing.
The molded harness only fits one way and ensures you don't get your wires mixed up, so Make Sure
You Use It ! You might also want to attach eyelet connectors to the end of the two wires on for
your convenience.
Different molded connectors may have different colored wires. We are
going to ignore the color of the wires and instead concentrate on the wire identification numbers
and letters on the alternator casing. Here are your basic hook ups. The electrical connections for your alternator are a simple but
important 4-wire hook up. It was mentioned earlier that the GM alternator should come equipped with
a 2 wire molded connector/harness. If not, ask for it at the point of sale or you can purchase one
at an auto supply store. Ask for a 2-wire harness plug for the GM style alternator with built in
regulator. They only cost a couple of bucks.
Attach your harness into the connector slot on the alternator casing.
The molded harness only fits one way and ensures you don't get your wires mixed up, so Make Sure
You Use It ! You might also want to attach eyelet connectors to the end of the two wires on for
your convenience.
Different molded connectors may have different colored wires. We are
going to ignore the color of the wires and instead concentrate on the wire identification numbers
and letters on the alternator casing. Here are your basic hook ups.
Basic Hook Up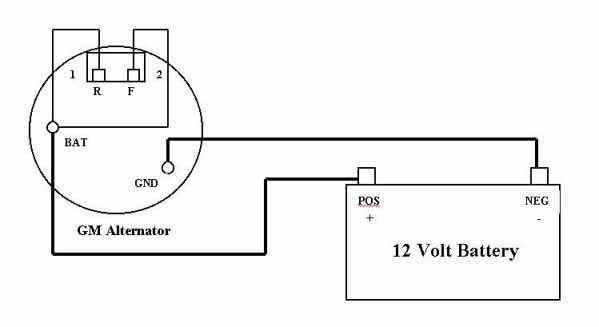 Consult a parts professional for additional wiring information. # 1 or R Terminal is the lead that supplies power to the rotor field of the alternator. Connect this to the "BAT" terminal of the alternator or the POSITIVE terminal of your battery. NOTE: when you are not using your system you have to disconnect this lead as it is now drawing power from your battery and will continue until it's completely discharged. # 2 or F Terminal is the voltage sensing line for the alternator. Connect this directly to the "BAT" terminal on the alternator or to the POSITIVE terminal of the battery as well. On/Off Switch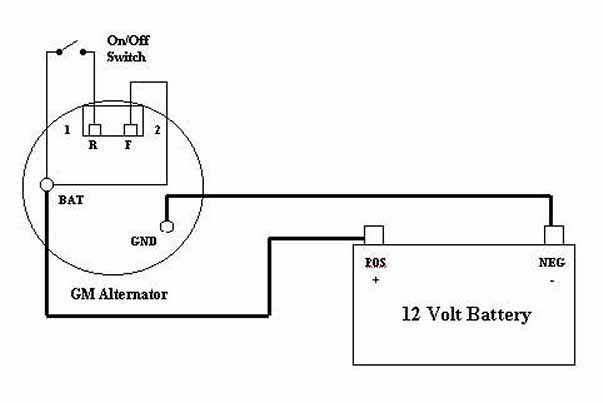
Consult a parts professional for additional wiring information. # 1 or R For safety and convenience reasons we have installed a simple on/off switch in the # 1 circuit. When we are not using our generator we can simply turn the switch off and it will preserve the charge in our battery. Another important note is that when this terminal is energized, so is the rotor field inside the alternator. You will now notice a lot of drag when you try to turn the alternator. Go ahead and try to start the motor, you will pull that cord until your tongue hangs out. You will need to start the motor with the switch "off" then throttle up to your desired speed. You can then turn your switch "on" and introduce the electrical load to the alternator and motor. This switch also allows us to avoid "sparks" during the unsafe practice of hooking up wires to the battery and alternator while the generator is running. In the presence of vapors coming off the batteries and gas tank, it's a good idea, so PLEASE USE IT !!! Some Testing ResultsWhat is the ideal size pulley to use?I hear the subject debated at great lengths. Actually any size pulley between 3" and 8" will work, but there are some differences. An 8" pulley will spin your alternator at a high r.p.m. but will give you very little torque. When it comes time to engage your alternator, it will drag your motor down until it stalls. A 3" pulley on the other hand will give you lots of torque, but a lower r.p.m. at the alternator pulley. We have discovered that if we try to duplicate what goes on underneath the hood of a car and apply this to our home built generators, we will come up with some favorable results. A quick peek under the hood of a car tells us the motor pulley should be about 5" to 6" in diameter. We found this diameter of pulley gives us an ideal r.p.m for the alternator, with an adequate amount of torque too....But. Motors With The Same Horsepower Do Not Have The Same OutputWe discovered another neat characteristic of the Briggs & Stratton Vertical shaft lawn mower engine. We have a Horizontal shaft Briggs & Stratton motor of the same horsepower. And we consistently get higher revs from the horizontal shaft motor. We couldn't figure this out at first. Both the motors were in good shape well tuned etc, but? So, I searched through the motor technical manuals for the answer. According to manufacturer specs, they set the throttle on the vertical shaft mower to approximately 80% of its maximum output. This gives the motor a nice little feature when a schlep like me starts cutting into foot tall wet grass. When the motor bogs down, a device on the engine called a "governor" senses the drastic drop in RPM's and immediately allows the engine to throttle up to overcome the extra load, so the motor will not stall. When the patch of wet grass passes by, the engine then throttles back to its normally set speed. So if you come along and decide to attach a belt and an alternator to this motor (like we just did) fire it up, engage your alternator and dump the load on the motor. Guess what? The motor is gonna think it's in wet grass Heaven. So, if you're using a 5" pulley on your project like we did, you may find that the motor will be dragged down to a stall even with a moderate load applied to it. So, how do we solve this? Well there are a couple different ways. One is to reduce the size of your pulley. 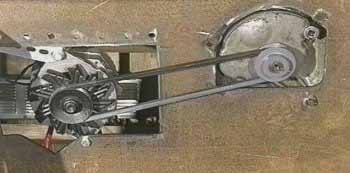 We experimented with a 3" pulley and got some good results. The smaller pulley lets
the alternator produce its voltage at significantly lower throttle settings, the trade off of course
is a lower amount of current (power) coming out of the alternator.
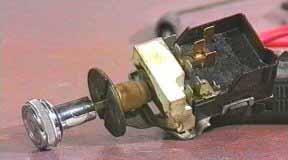
Or,...there is another option. We discovered a handy little gadget that helps us
solve the problem of engine stalling when you engage the alternator. It's a GM style
headlight/dimmer switch. We installed this into the #1 (R) circuit of the alternator harness.
The adjustable dimmer in the switch is actually a variable resistor or otherwise knows as a
rheostat. It works by using resistance to adjust the flow of current to the alternator's rotor
field. The more resistance you have, the less current will flow. This in turn creates a weaker or stronger magnetic field in the alternator, which will then
give us more or less power off the alternator. Huh? We experimented with a 3" pulley and got some good results. The smaller pulley lets
the alternator produce its voltage at significantly lower throttle settings, the trade off of course
is a lower amount of current (power) coming out of the alternator.
Or,...there is another option. We discovered a handy little gadget that helps us
solve the problem of engine stalling when you engage the alternator. It's a GM style
headlight/dimmer switch. We installed this into the #1 (R) circuit of the alternator harness.
The adjustable dimmer in the switch is actually a variable resistor or otherwise knows as a
rheostat. It works by using resistance to adjust the flow of current to the alternator's rotor
field. The more resistance you have, the less current will flow. This in turn creates a weaker or stronger magnetic field in the alternator, which will then
give us more or less power off the alternator. Huh?
 Let me explain it in a more practical sense. Let's say you have a generator like we
just built operating at normal running speed spinning a 40 Amp alternator. You decide to charge a very
low battery. Even if you rev up the motor, when you go to attach your lead from the alternator
to the battery, the alternator is going to sense a low battery
charge and will try to out-put a large amount of current. This creates a huge drag on the alternator
which in turn bogs down the motor usually until it stalls.
But, this is what happens when you have the dimmer switch in the #1 circuit. You
set the switch at its highest resistance level. Now start turning the knob slowly counter-clockwise.
As you keep turning the knob to the left, the resistance level in the switch drops allowing more current
into the alternator's rotor field, which in turn allows more alternator output. You will notice
at this point the alternator is now starting to "load" the motor. The beauty of
this method is while you slowly turn the switch and load the motor, you can now offset the load
with a higher throttle setting on your motor. You can then adjust the switch some more, then increase the motor
revs some more until you get a desired speed, without stalling. This system allows a nice gradual
smooth adjustment of the alternator's output. It works really slick, try it. And the switches are
cheap too, we picked up ours at an auto wrecker for 5 bucks.
Let me explain it in a more practical sense. Let's say you have a generator like we
just built operating at normal running speed spinning a 40 Amp alternator. You decide to charge a very
low battery. Even if you rev up the motor, when you go to attach your lead from the alternator
to the battery, the alternator is going to sense a low battery
charge and will try to out-put a large amount of current. This creates a huge drag on the alternator
which in turn bogs down the motor usually until it stalls.
But, this is what happens when you have the dimmer switch in the #1 circuit. You
set the switch at its highest resistance level. Now start turning the knob slowly counter-clockwise.
As you keep turning the knob to the left, the resistance level in the switch drops allowing more current
into the alternator's rotor field, which in turn allows more alternator output. You will notice
at this point the alternator is now starting to "load" the motor. The beauty of
this method is while you slowly turn the switch and load the motor, you can now offset the load
with a higher throttle setting on your motor. You can then adjust the switch some more, then increase the motor
revs some more until you get a desired speed, without stalling. This system allows a nice gradual
smooth adjustment of the alternator's output. It works really slick, try it. And the switches are
cheap too, we picked up ours at an auto wrecker for 5 bucks.
Variable Resistance Dimmer Switch Hook Up
Consult a parts professional for additional wiring information. Which one of these two methods will work better for you? It's hard to say, depending on the type of motor you will use. How old is it? Is it tuned up? What kind of parts you installed on your project? No two set ups are the same, but at least you have some options. Try what works best for you and stick with it. Some Final Notes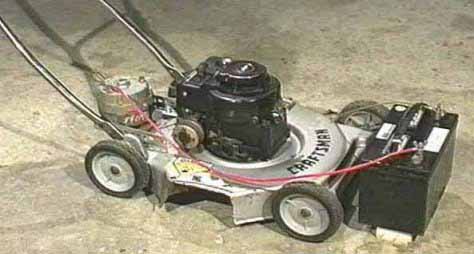 You can now re-attach your handles. A really handy option is to hook up your throttle cable again
and then mount your GM dimmer switch next to your throttle control on the handle. You now have complete
control of your generator right at your finger tips.
So, there you have it. You are now armed with the information to be electrically
independent should the need ever arise. Stay healthy and stay powered. You can now re-attach your handles. A really handy option is to hook up your throttle cable again
and then mount your GM dimmer switch next to your throttle control on the handle. You now have complete
control of your generator right at your finger tips.
So, there you have it. You are now armed with the information to be electrically
independent should the need ever arise. Stay healthy and stay powered.Copyright © 1999 Gemini Media Productions Inc All Rights Reserved
|